
The Saskatchewan Science Centre Online! Check out our hilarious and educational web series “SSCTV”, find downloadable resources, explore other cool science links, and tune into the live BUBOCam!
Stop Motion Movie Challenge
Get creative, use your imagination, and direct your own motion picture! Using single images, you will create your own movie using stop motion animation.
Stop Motion Animation
Get creative, use your imagination, and direct your own motion picture! Using single images, you will create your own movie using stop motion animation.
What you need
There are many great apps that you can use to create your animation. Here are a few suggestions that we have tried and are available to download for free:
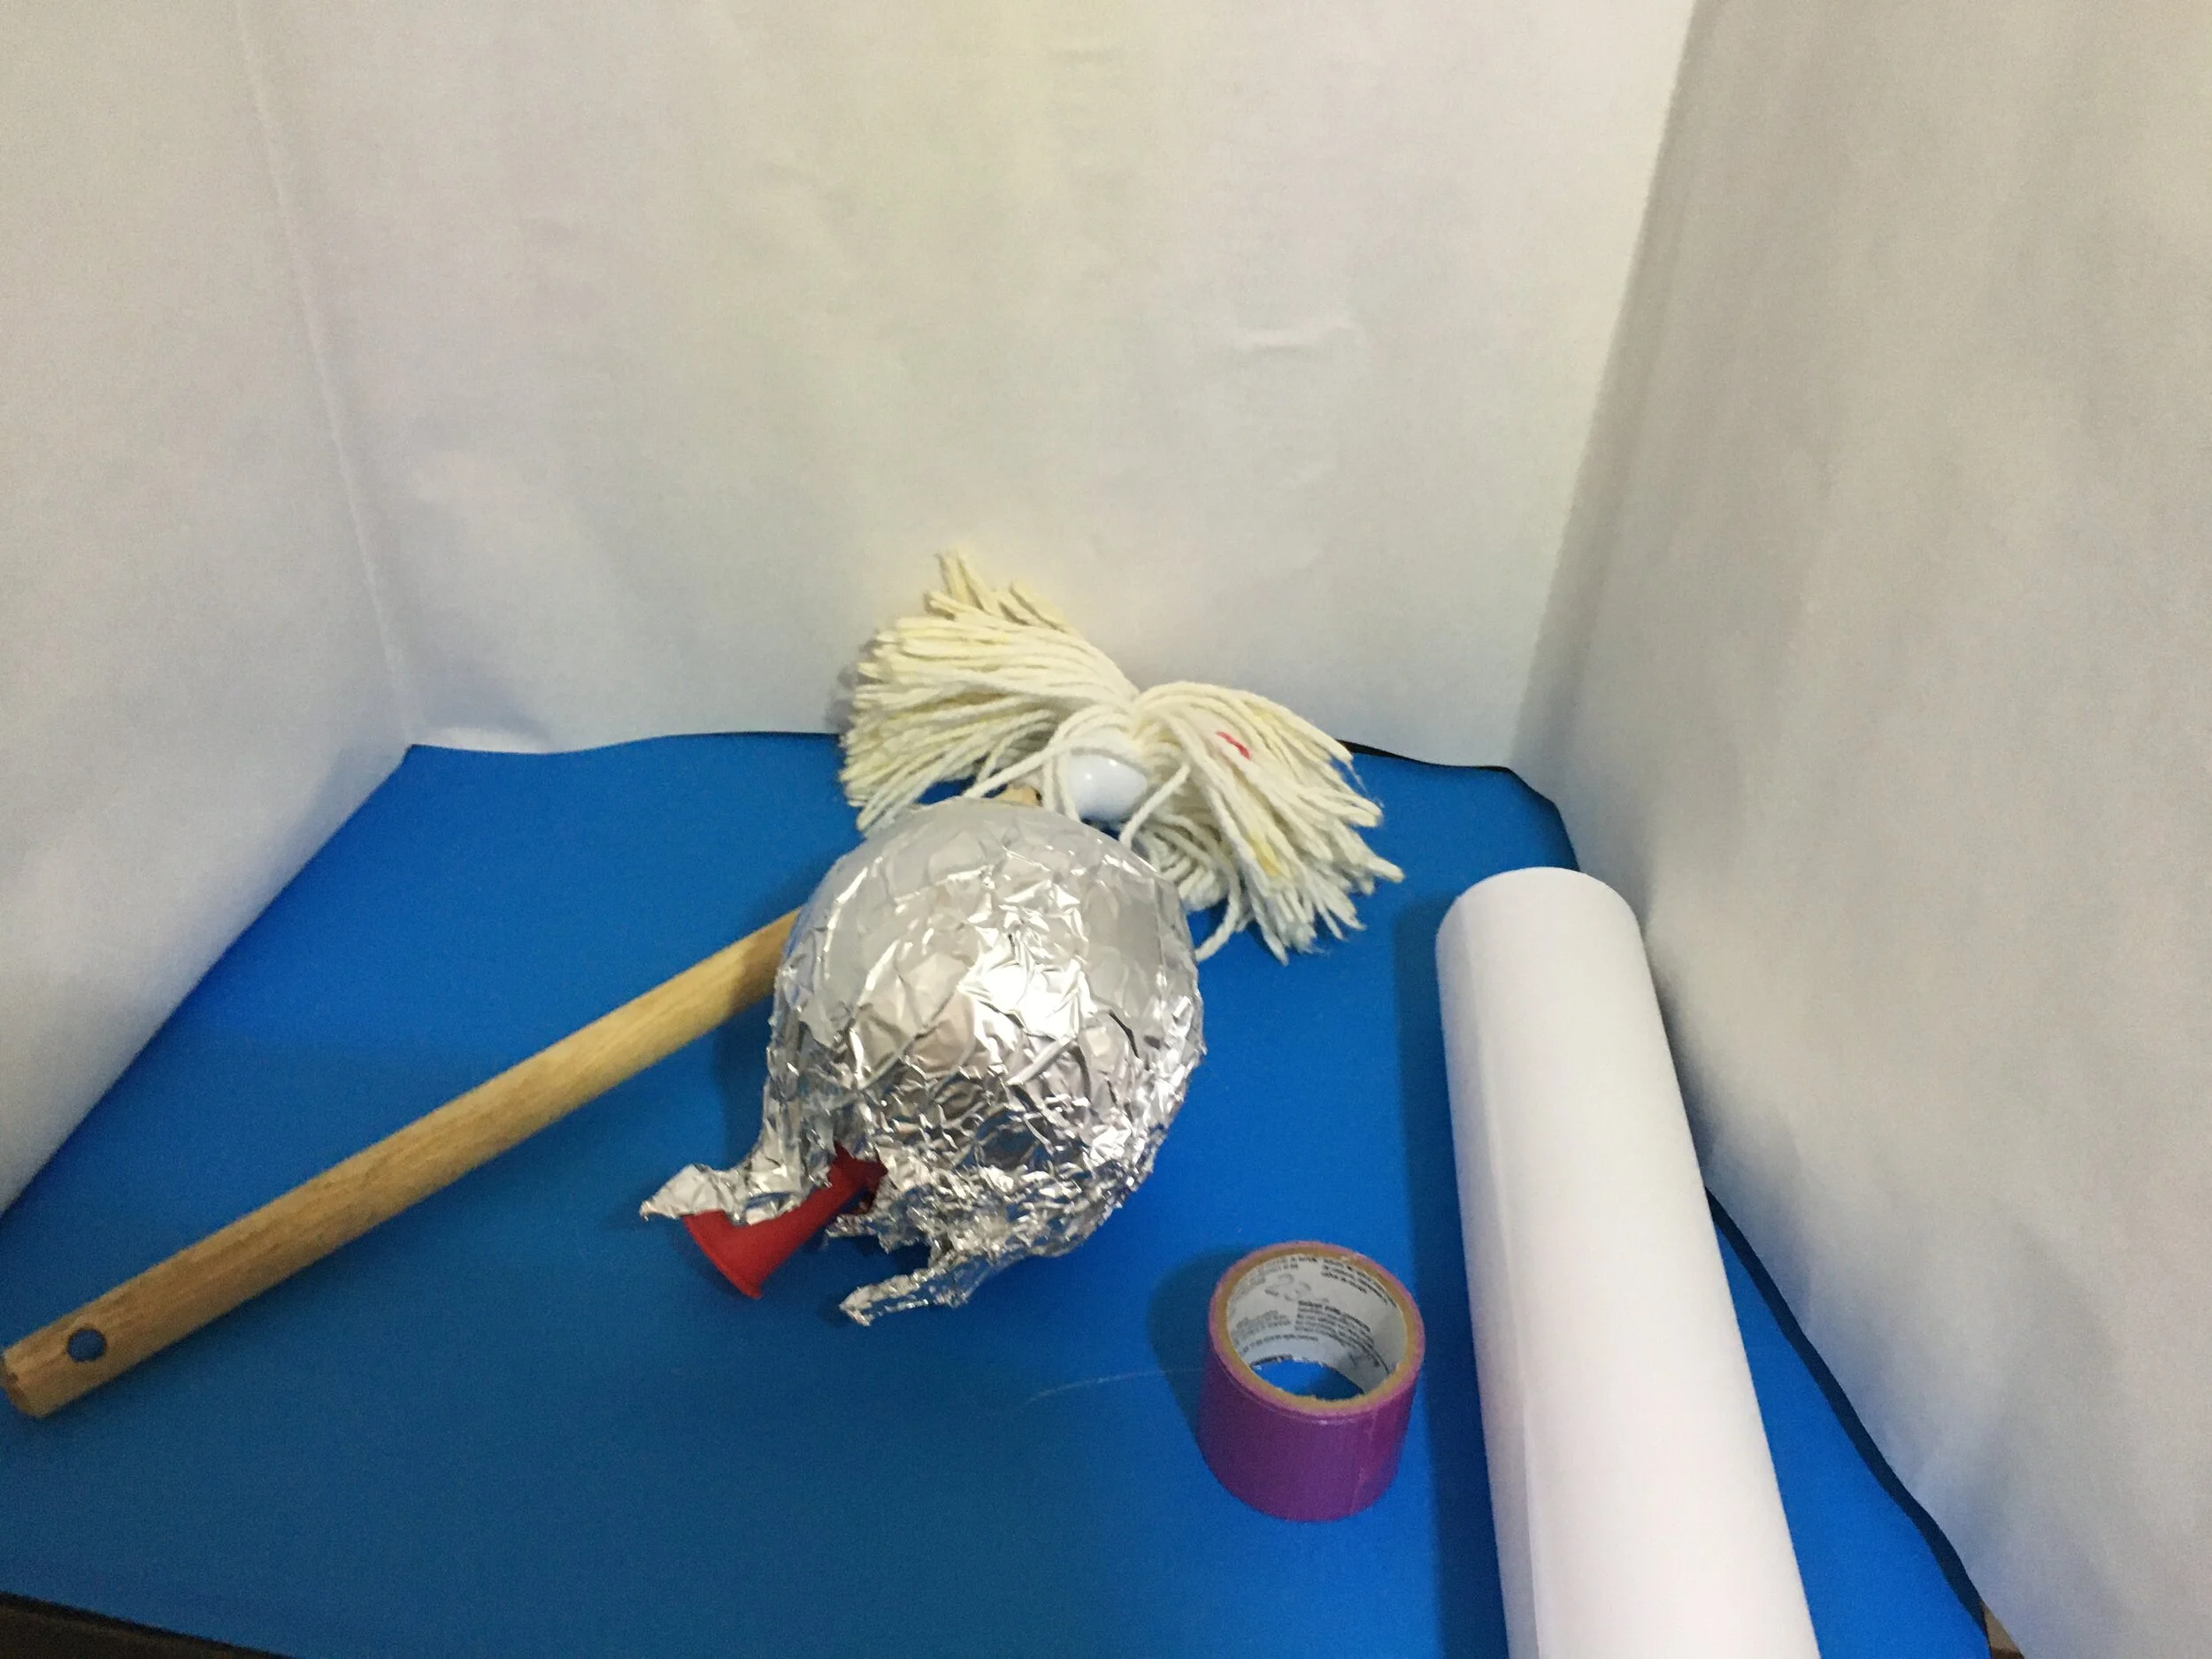
You will also need:
Backdrop – cardboard, whiteboard, or poster paper
Camera on a phone or tablet
Tripod to hold the camera
Toys or other objects
Clay to make claymation
What you do
Write your story. Start by building your story. What do you want it to be about? Use your imagination to think of a unique story. Having a storyboard to get your ideas out helps when you are capturing your images later. Each box in your storyboard has a drawing of the image you want to capture along with the actions you want to take.

Build your set. Create a backdrop that is stable and will not move. This can be done using cardboard or other heavy material. Draw or add graphics to create the background you want for your story.

Create your characters. Using your story as a guide, find your characters. You can use toys, action figures, or even make your own out of paper or clay.
Start filming. Be sure to have the app you are using already downloaded. Each app will be a bit similar, but it is a good idea to review any available tutorials or make a few test videos and practice using the apps features.

Tips and Tricks:
Be sure to have good lighting. Position the lights so there are no shadows as you take the images.
Use a tripod for the camera and a stable background. Both should be kept still for the entire scene. This really helps to make sure that all the images are consistent from picture to picture (or frame to frame) and the only things that move are things you want to move. Some apps will use something called onion skinning, which shows a shadow of the previous image. This feature helps to know how each object has moved.
Use scrapbook paper or posters as a cool background. You can also use a green screen with some apps to be able to change the background later. Here are a few examples of short stop motion videos.
Sample Stop Motion Videos
Explanation:
Stop motion animation uses multiple images connected together to make an animation. In each image something changes just a bit, making what you are watching appear as if it is moving. In most films, there are 24 still images (frames) per second. Your brain puts all those images together as a series of moving images.
Notes:
At Home Lesson Plan - http://www.makerspaceforeducation.com/stop-motion-animation.html
Tips To Get You Started - http://www.teenlibrariantoolbox.com/2015/12/take-5-stop-motion-animation-hacks-for-a-makerspace/
Instructables - https://www.instructables.com/id/How-To-Make-a-Stop-Motion-Video-Using-your-Phone/
Collection of Apps - https://www.colourmylearning.com/2017/11/the-best-stop-motion-animation-kits-for-kids/
SSC Interview - Discovering Exoplanets With Dr. Edward Gomez
Lisa from the Saskatchewan Science Centre talks with Dr. Edward Gomez of the Las Cumbres Observatory in Cardiff, Wales about discovering exoplanets!
Lisa from the Saskatchewan Science Centre talks with Dr. Edward Gomez of the Las Cumbres Observatory in Cardiff, Wales about discovering exoplanets!
Dr. Edward Gomez is the Education Director at the Las Cumbres Observatory in Cardiff, Wales.
Fascinated by astronomy since childhood, he realized that he could use math and computers to do fun things with astronomy. A professional astrophysicist, his role with the observatory is to find novel ways to engage the public in astronomy. This has taken the form of creating citizen science projects like Agent Exoplanet, interactive educational web apps like Star in a Box, and online community events like Show Me Stars. The global education hub for LCO is based in Cardiff University where he is an honorary lecturer/adjunct faculty in the School of Physics and Astronomy.
Dr. Gomez provided science advice to the BBC Wales script writing team for several episodes of Doctor Who (during the time of the Tenth Doctor), including The Sontaran Stratagem and The Sarah Jane Adventures. He regularly appears on the BBC radio wales programms Science Cafe and the Eleri Sion Show. He has served as guest judge for the national Debating Matters competition. Currently he is working at how to make a global telescope network accessible to the general public and what tools are needed to make the most of their potential. He is particularly concerned with using the power of astronomical images to inspire people who would not normally be interested in science.
Learn more about Dr. Gomez here.
Loving this content? Make a donation to the Saskatchewan Science Centre!
#doctorwho #science #exoplanets #gallifrey #SaskScienceCentre #AtHomeWithCASC #ScienceChampions #ScienceAtHome #realsciencerealfun
SSCTV - Candy Glass, Silicon, And Steam!
Q: What do candy glass, silicon, and steam have in common?
A: They’re all covered in this week’s episode of SSCTV!
Q: What do candy glass, silicon, and steam have in common?
A: They’re all covered in this week’s episode of SSCTV!
Jesse explores crystalline and amorphous solids through the power of movie props, Elements ‘R’ Us has an offer you can’t refuse on silicon (not silicone) and Sally Science answers a great question from Brixton!
Do you have a question for Sally Science? Send it to us on our socials, or email a video to rholota@sasksciencecentre.com!
Additional Resource:
https://www.scientificamerican.com/article/shattering-sugar-make-movie-ready-sugar-glass/
Loving this content? Make a donation to the Saskatchewan Science Centre!
#scienceathome #candyglass #movieprops #steam #stem #SaskScienceCentre #AtHomeWithCASC #ScienceChampions #realsciencerealfun
Science At Home - Oobleck
Hey Science fans!
Today we explore the incredible world of Oobleck!
Hey Science Fans!
What do you call a liquid that isn’t a liquid, at least all the time? The technical term is a non-Newtonian fluid, but a lot of people call it oobleck – in reference to the Dr Seuss book Bartholomew and the Oobleck!
Centuries ago, Sir Isaac Newton proposed that fluids should behave in a constant, predictable way – think about water. If you’re swimming, it doesn’t matter if you’re swimming fast or slow, the water will always flow around you. Liquids that behave this way are called Newtonian Fluids. However, not all fluids behave this way. We call these fluids non-Newtonian fluids, and we’re going to show you how to make some today!
You’ll need a pie plate, some cornstarch, and some water. Feel free to add some food coloring if you like.
Start with a cup of cornstarch and then slowly add water until the cornstarch is no longer grainy – you’ll probably need about ¾ of a cup, but your results may vary. As you slowly mix the cornstarch and water, you’ll *think* you’re creating a normal fluid – you can move your spoon freely, and even scoop it and pour it. But, if you slap the top of the dish with your hand – it’s suddenly a solid! You can even pick it up and create a ball with it in your hands, but as soon as you stop applying pressure it falls apart and runs through your fingers!
So, what’s the science here? As you apply force to the oobleck it become MORE viscous. The particles of cornstarch get jammed into each other, trapping the water molecules between them and preventing them from flowing the way they normally would. Scientists don’t ACTUALLY know all the details about why or how this works! But there is significant interest in oobleck because there are a lot of potential uses. For example, it could be used to make very comfortable body armor for first responders, or even a fast, temporary filling for potholes!
Cornstarch and water aren’t the only non-Newtonian fluids, or even the most famous. In fact, if you’ve ever eaten French fries, you probably know about another - ketchup! Ketchup is also a non-Newtonian fluid – but instead of getting thicker under pressure like the cornstarch mixture does, ketchup gets thinner! That’s why it’s easier to get ketchup out of a plastic squeeze bottle than it is to get it out of a glass bottle.
Try this demonstration for yourself - and share your results below!
Loving this content? Make a donation to the Saskatchewan Science Centre!
#scienceathome #oobleck #newton #SaskScienceCentre #AtHomeWithCASC #ScienceChampions #realsciencerealfun
Build A Vermicompost Hotel
Invite some of your worm friends over to your brand new worm hotel! Create a living ecosystem called a vermicomposter and learn how worms can speed up the composting process of your vegetable and fruit scraps from your kitchen — making rich, natural fertilizer for your garden.
Invite some of your worm friends over to your brand new worm hotel! Create a living ecosystem called a vermicomposter and learn how worms can speed up the composting process of the vegetable and fruit scraps from your kitchen — making rich, natural fertilizer for your garden.
Activity Type:
Project
Age:
7 years old (with adult supervision) to adult
What You Need:
• 3 x 2-gallon or 5-gallon pails
• 1 x lid for a pail
• Drill & drill bits (1/8” & 1/4” )
• Red wiggler worms
• Newspaper
• Carbon-based material — cardboard, wood chippings, grass clippings, or recycled egg cartons
• Food scraps
• Water in a spray bottle
• Optional: a small amount of garden soil, gardening gloves, screen material, erasable marker.

Buckets And Drill For Your Worm Hotel

Starting Supplies For Vermicomposter
What You Do:
Step #1
Using a drill and 1/8” drill bit, drill holes into the sides of two of the pails. Spread out the holes from top to bottom and all around. This helps provide aeration for your vermicomposter.
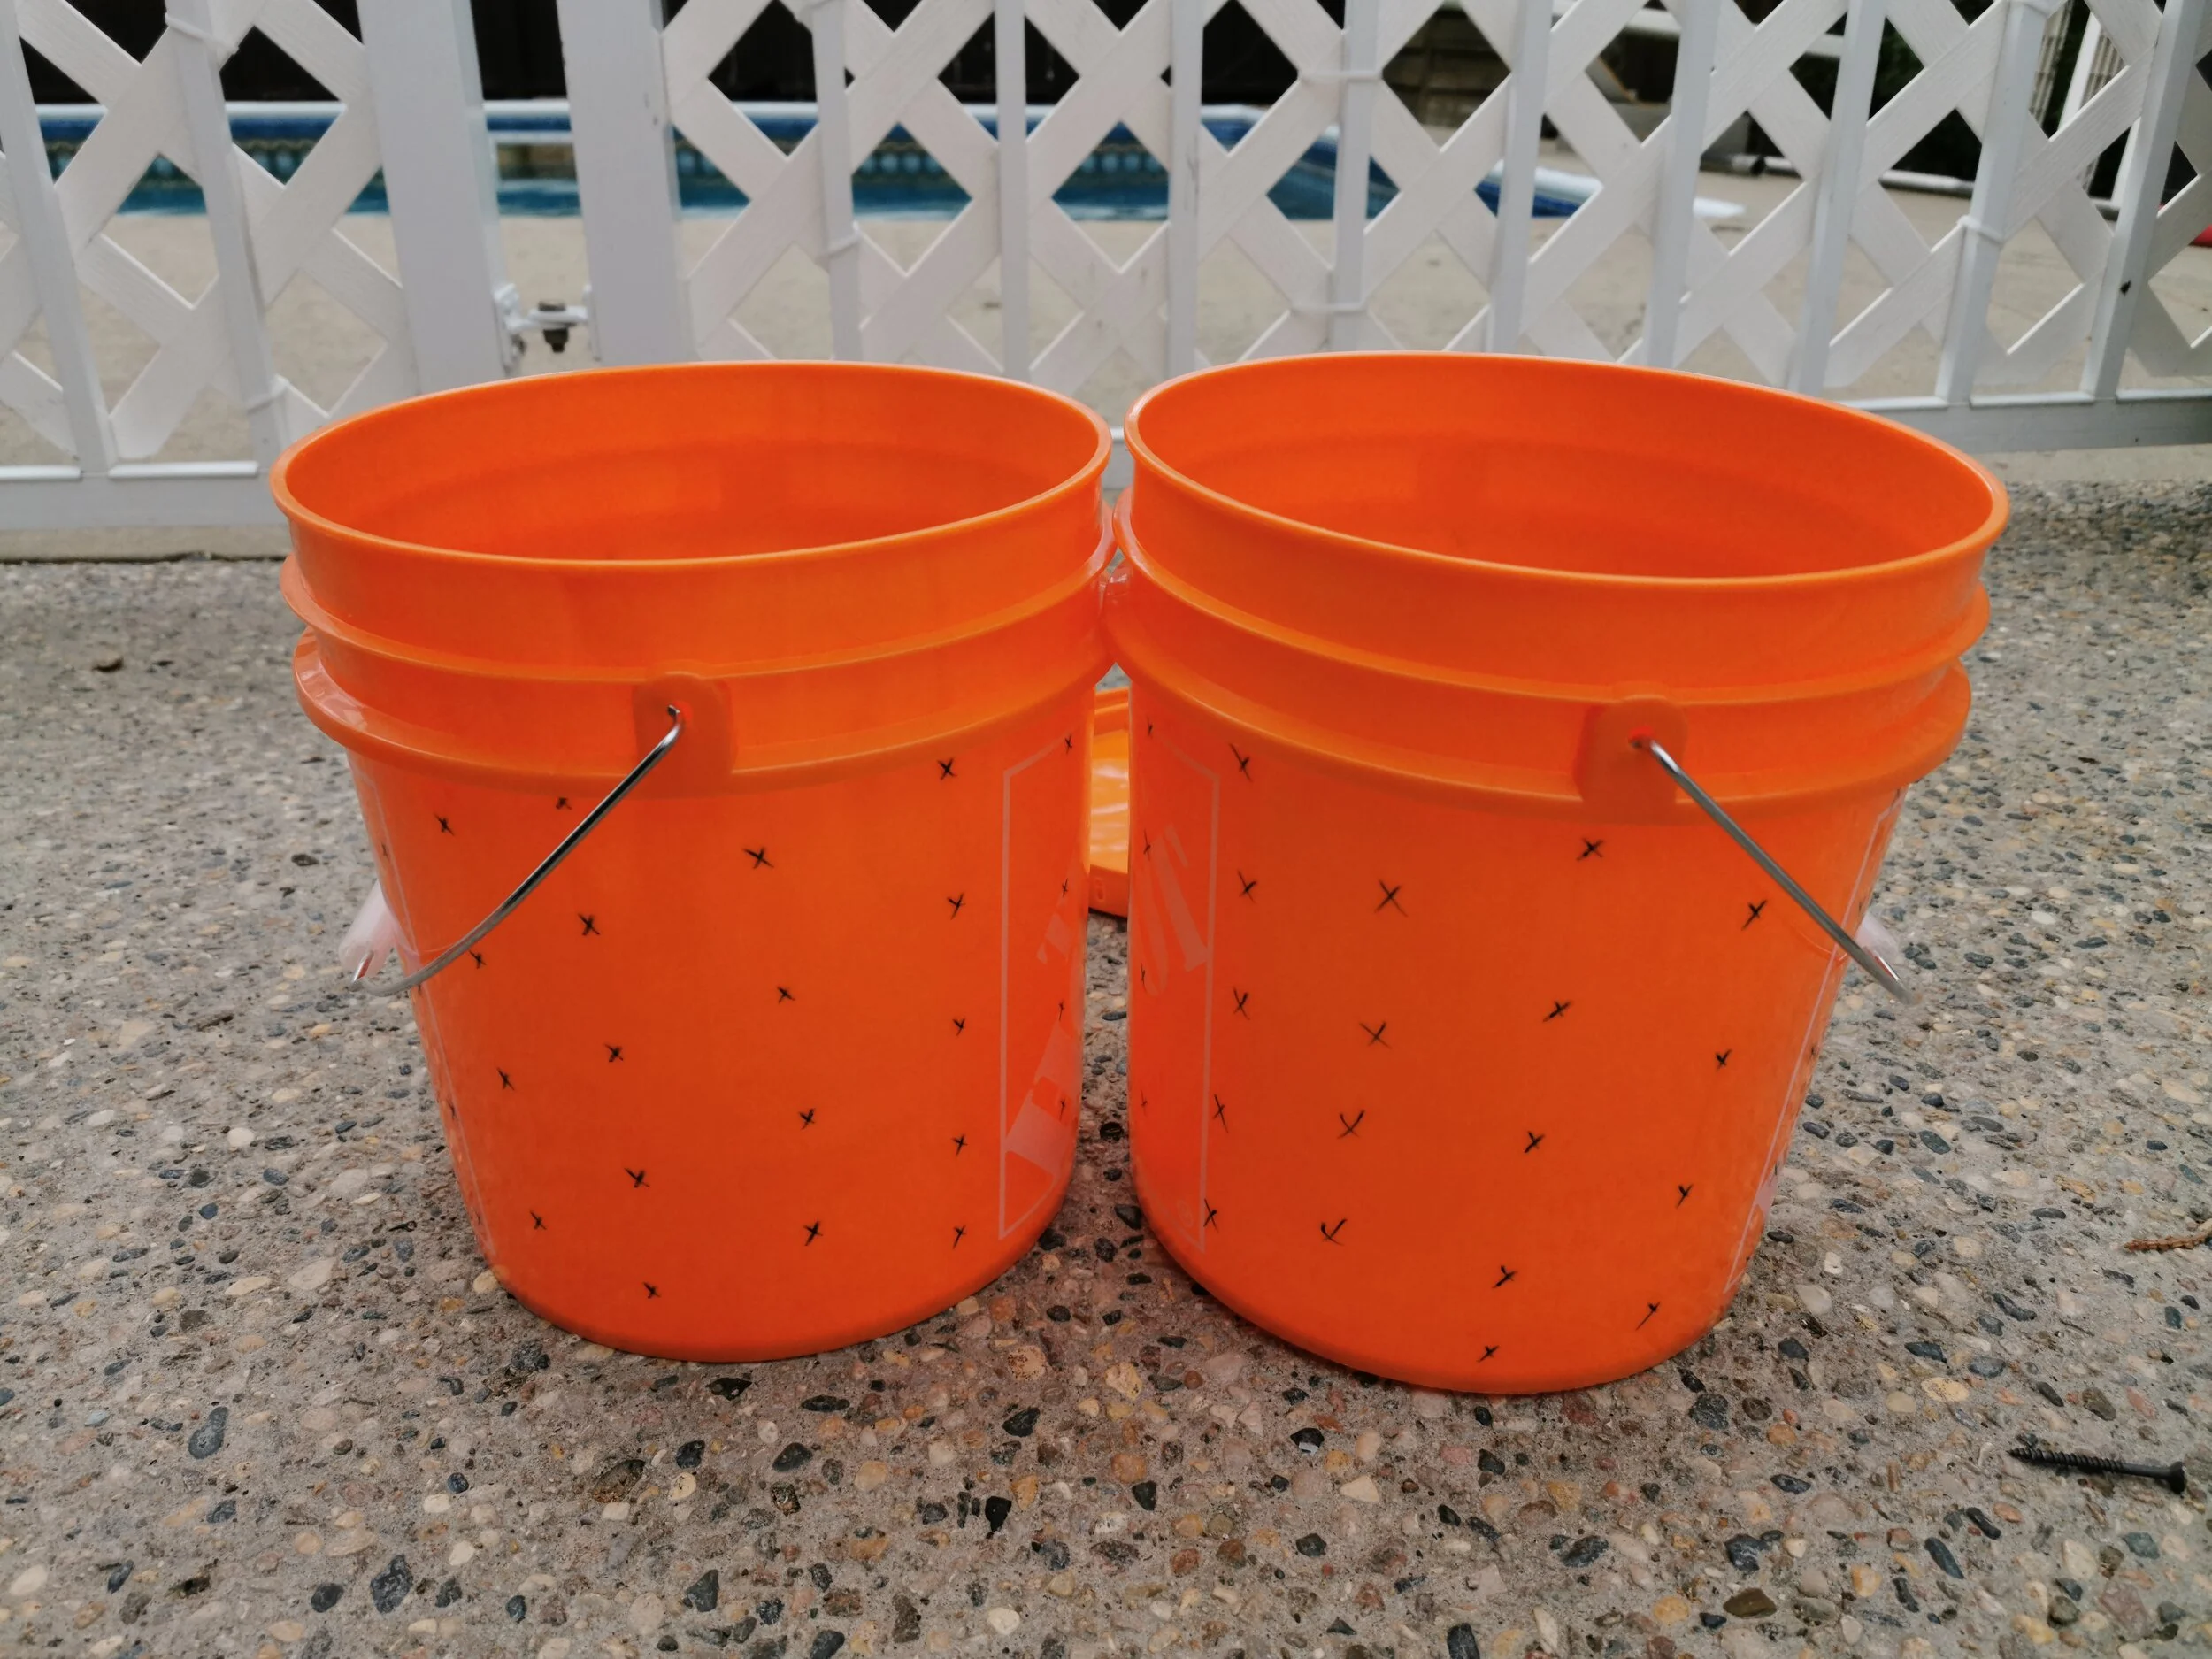
Mark Holes On Two Of The Buckets

Drill Holes In Buckets
Step #2
In your third bucket, drill holes that are 6 inches from the top of the bucket. Keep all holes above the 6-inch mark and don’t drill any lower than that. This is where any liquid will be caught at the bottom of the vermicompost. Add the lid to the bucket and drill air holes into it as well. (Approximately 20-30 holes)

Mark & Drill Holes On Drain Bucket

Drill Holes In Vermicompost Bin Lid
Step #3
With the ¼” drill bit, make 15 to 20 holes into the bottom of the first two pails (NOT the liquid catching bottom pail). Remove any dangling plastic pieces from the holes and empty all the plastic bits from the pails. When completed, put one of the pails into the liquid catching pail. This is your first working pail for the vermicomposter.

Drill Holes In The Top Two Buckets

Slide The Buckets Together
Step #4
In the first working pail, cover the holes in the bottom with 2 sheets of newspaper to cover the holes and spritz lightly with water. Do not soak, only moisten! This is to allow liquid to go through to the bottom pail but prevent worms from falling into the bottom pail.

Add Two Sheets Of Newsprint To The Bottom
Step #5
Add shredded newspaper and other carbon-based material to create bedding for the worms. This helps keep the temperature and moisture levels at the right spot for your vermicompost.

Shredded Newspaper In The Vermicomposter
Step #6
Add the worms, also add the bedding and casting (compost) that the worms came in.

Red Wiggler Worms For The Vermicompster
Step #7
Add a very small amount of food scraps and cover with carbon material. Allow the worms to adjust to their new surroundings for about a week before adding more scraps.
Store your worm hotel in a room temperature, darker location such as under the kitchen sink or in a laundry room. Make sure to put the lid on tight. Optional: You can add the screen material to the lid to help prevent flies/bugs from entering your vermicomposter.

Vegetable Food Scraps Make Great Worm Food

Cover With Shredded Paper
Step #8
After a week or so, you are ready to start adding scraps regularly. Make sure to add the right kinds of foods and not too much at one time. When adding scraps, dig a small trench on one side, add scraps and cover with more bedding or carbon-based material. Avoid using dirt for this (but it is suitable in a pinch). Leave for 1 to 2 weeks until all the scraps are processed. If they are not processed in 1 or 2 weeks, you have overfed your worms. When adding more scraps, add to the other side of the bucket and move around the spot you add the food scraps.

Swapping Buckets Around
Step #9
As the worms start to process your kitchen scraps, they will produce more and more castings (compost). As the containers starts to fill, it is time to add the 3rd and final pail to your vermicomposter.
Step #10
Add the third pail on top of the vermicomposter. Add some carbon rich shredded newspaper to the bottom, spritz with water, add scraps and more newspaper, wood chippings (small amount), egg carton or shredded cardboard.
Step #11
The worms will work their way up into the new working layer of your vermicompost over time and leave all the castings in the first working layer to be harvested. You can add a fourth bucket in time and rotate the 3rd and 4th buckets for easy harvesting.
Reaping The Rewards:
You will end up with liquid in the bottom bucket, called “worm tea”, this liquid is an amazing fertilizer. Dilute the worm liquid with water and use in your indoor plants and garden. Mix your worm castings (processed food, worm poo!) into your vegetable soil and see how great your yields are.
Tips For Best Results
Do not use meats, bones, processed foods, dairy, spicy foods, highly acidic, oily, or non-foods in your bucket, and minimize grains. Stick to vegetables and fruit as well as things like coffee grounds, tea leaves, and blended eggshells for grit and texture.
Cutting your scraps into smaller pieces helps speed up composting time and is better for smaller buckets.
Your compost bin will not smell if you are feeding them the right types and amounts of scraps, but if you do find there is a smell, then the microorganisms in your vermicompost have gone from aerobic to anaerobic, and adding more carbon rich scraps, such as shredded newspaper should help return the microorganisms return to an aerobic state
Keep your vermicompost in a place in your home that is darker most of the time (laundry room/crawl space/cupboard) and in a temperature of 13 to 25 degrees Celsius. If it is too cold or too hot, your worms will slow down their consumption. Ideal Moisture: 60-70% moisture is ideal, if too soggy add more carbon-based material. Spritz with water if you think the vermicompost is too dry.
Taking It Further:
Vermicomposting – the use of worms to convert organic waste into fertilizer.
Compost Castings - a convoluted mass of soil, mud, or sand thrown up by an earthworm or lugworm on the surface after passing through the worm's body. Castings are also known as vermicast, worm manure or worm poo.
As the worms eat through the compost in the worm bucket, the leftover worm waste(castings) is an optimal soil enricher. Red wiggler worms are the best choice for quickly converting food scraps into fertile compost and can eat about half of their weight in food every day. Tiny sensory cells in their mouths alert the worms when they have found the more nutritious scraps. When food enters the mouth, the pharynx acts as a suction pump to pull the food into the digestive tract. It travels through the esophagus, into the crop. After the food has been crushed in the gizzard, it travels to the intestine. The intestine takes up most of the length of the worm. This is where nutrients are absorbed. At the end of the worm is the anus. Dark, earthy material called “worm castings” are excreted. Worm castings are alive with soil-friendly bacteria and valuable nutrients.
Additional Resources:
https://home.howstuffworks.com/vermicomposting1.htm
https://unclejimswormfarm.com/red-worms-eat-compost/
https://www.gardeningknowhow.com/composting/vermicomposting/worm-castings.htm
Loving this content? Make a donation to the Saskatchewan Science Centre!
#SaskScienceCentre #AtHomeWithCASC #ScienceChampions #ScienceAtHome #realsciencerealfun #wormfarm #compostbin